JAX-WS, Eclipse, JBoss


Ok another Java post, they are few and far between, but I’ve already polluted this blog with objective-c, javascript and other non .net languages so why not.

So I was lying in bed last night my wife was hogging the windows machine watching some film or other, so I’d a choice between reading 50 shades of grey or firing up my mac book air, no contest there…

 
I recently interviewed a guy that had moved from Apache Axis to JAX-WS, the way he described it sounded a lot like WCF (windows communication foundation) so I wanted to see for myself.


  • Install Jboss 7.1.1 for an application server
  • Install Eclipse juno IDE for Java
  • Install Mono Develop (not necessary but i had this already for iPhone dev so thought what the heck I’ll use it for the client)

So what is JAX-WS? The Java API for XML Web Services (JAX-WS) is a Java programming language API for creating web services. It is part of the Java EE platform from Sun Microsystems. Like the other Java EE APIs, JAX-WS uses annotations. Here’s how I created a sample one.

Ensure JBoss can run

Start the standalone shell script and check you can see http://localhost:8080 page below in your browser

clip_image001

Choose JavaEE perspective in Eclipse

clip_image002

Create a new project in Eclipse  (dynamic web)

clip_image003

Add the following webservice class

Complete with annotations

clip_image004

Modify web.xml

Add the highlighted section

clip_image005

Configure the Local JBoss server in eclipse

Right click on the server you added and choose Add/Remove

clip_image006

Add your deployment

clip_image007

Add your current deployment
clip_image008

Start Application Server

Click on the Play button in the server tab toolbar, you should be automatically switched to the Console pane in Eclipse. Take note that your DynamicTest war file is deployed.

clip_image009

Review the JBoss Admin Console

Specifically the Webservice Endpoints, You should see your webservice deployed here.

clip_image010

You can also browse to the wsdl

clip_image011

Create your client

I used C# with the Mono Develop IDE to create a simple Console Application

clip_image012

Just add a Webservice the way you would in Visual Studio (I went for .net 2.0 WS because the WCF version didn’t create an app.config for me (visual studio you spoil me)).

Run

clip_image013

And that’s it your first JAX-WS! (and not a windows machine in sight.. I feel dirty but I like it :-) )


=== UPDATE ===

Ok after reading a lot of blogs and a few weeks later i've found a nicer way of doing it.

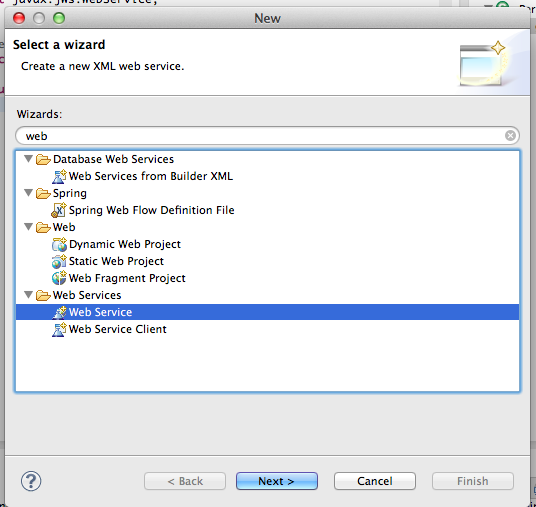
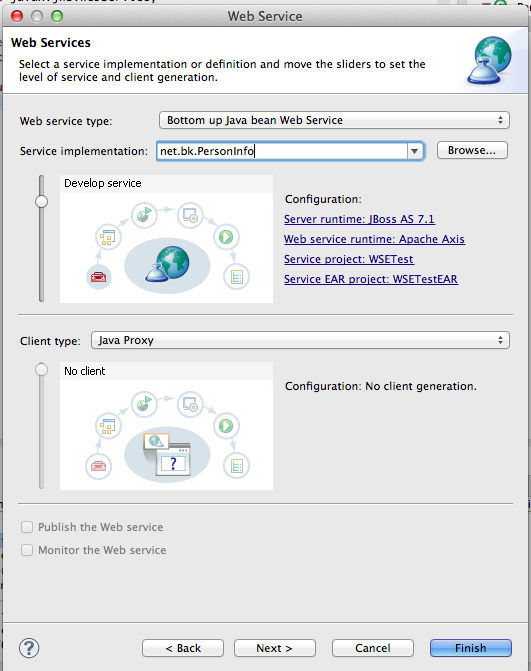
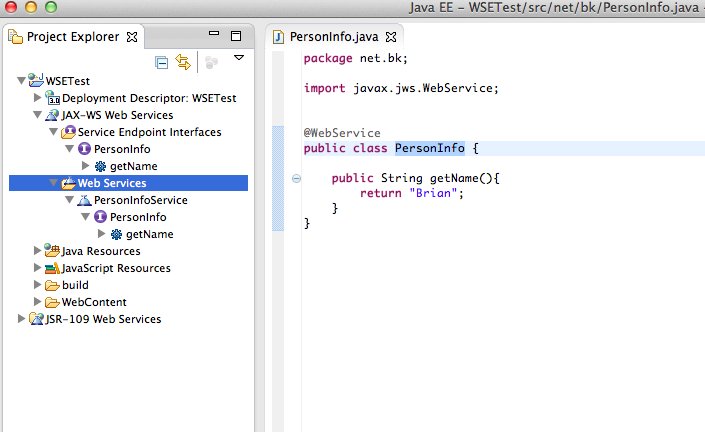
Instead of editing the xml you can choose to add a new webservice and select your webservice class (note screens below are not for the same project but are functionaly the same


Customization of WebApi


If you’ve used Asp MVC Web Api then you are most likely familiar with the notion of content negotiation, this is the process where the content returned in the response is dictated by the accepts header in the request. In sort if you request xml you get xml back, if you request json you get json back.

This is done by what we call Formatters. You can of course add your own formatters, e.g. let’s say you have an application that returns human resource details; you may request back a profile picture by hitting the same route with a different request header.


OOB Formatters

Lets take a working example, of what we get out of the box (OOB).

Create a new Web Api project

Add the following class

image

Modify the ValuesController as follows

image

We now should be able to run the project and see the following in the browser

image

So by default we get back an xml formatted response, of course we could request json, but what if we just don’t want xml?

Tweaking the config


Add the following line to your Global.asax.cs

image

Now add this new GlobalConfig static class as follows

image

Run your application again

image

Now we get json by default, yah!


But wait a second, what if I know that I have some javascript developers that want to use this content, wouldn’t be nicer to offer camel casing to these guys?

image 

Run project again

image

e.g some simple jQuery

image

Eureka moment


After all these years, where I’ve modified connections strings etc in the web.config release folder.
I’ve finally realised I can preview the transformation that Visual Studio Does. To be really honest I’m not sure if this is a new feature of VS2012 or if it always existed, but it’s fantastic, give it a go if like me you’ve been living in the dark ages.


image

image

Removing sensitive data from git


Ok, so in my case it was not so sensitive, I had generated a publish profile for one of my projects, that said I don’t want the world and their aunty to be able to publish their apps to my server so I needed to remove my sensitive data from git.

Here’s how

git filter-branch --index-filter 'git rm --cached --ignore-unmatch mySensitive.data' 
  --prune-empty --tag-name-filter cat -- --all
git commit -m "Add Rakefile to .gitignore"
git push origin master –force


The above removes the file from history, you could add it to your .gitignore to ensure it’s not accidently added again.

An image button in iOS


So as I wait for my second iPhone application to be approved by the apple store, I start to wonder a few little things. How can I improve my existing apps through functionality and user experience.

Given I’m pretty much a noob with iOS dev still compared to most other languages/platforms i know,  you’ll have to pardon me if I’m giving you a bum steer!

I did consider a few options before proceeding down this route:

  • Subclassing UIImageView and handling the touches once I’d enabled interaction,
  • Subclassing UIImageView and using a gesture recogniser

However I found the following method really simple.

Where we are going

Here we see a picture of the iPhone simulator showing my button with an image, this is what we are going to produce.

Screen Shot 2012-11-28 at 22.49.00

How we got there

I fired up photoshop and created a 32x32 png8 for this image, don’t try to figure out what it’s supposed to be, it’s just random drawing…

I then dragged this testButton.png I created to my XCode project

Screen Shot 2012-11-28 at 22.38.55


Next in the XCode project you’re working on, drop a button onto your a view in your storyboard/nib, we’re going for image only, so change type to Custom and remove the default title. If you loose selection you can regain it by selecting the button in the ViewController Scene on the left hand side.

Screen Shot 2012-11-28 at 22.39.39  


So next some code, first of all, right click (crtl+click) and drag the button onto the ViewController header file (use the assistant editor to help you, we want to create an IBOutlet so we can reference this button

image

Now we’re nearly there, just one line of code to set the image for the normal state.

Screen Shot 2012-11-28 at 22.41.12

That’s pretty much it… I could subclass all this into an UIImageButton but it’s probably overkill unless I go to the hassle of plugging into the XCode designer for image selection etc… something for another day perhaps..


Edit

I did say i was a noob yes? Well I quickly came across a problem with the above method in that designing the application became a little difficult setting the coordingates given I had to run the app to see where my button was, not ideal when i'm slicing in parts of my UX.

There's an easier way to select the image for the button... set the background in the property tab!!!! (highlighted below in red)

The lazy singleton pattern revisited.


If you want to get a feel for the singleton pattern in C# one of the best resources I always revisit is on John Skeet’s (@jonskeet) website  http://www.yoda.arachsys.com/csharp/singleton.html

I encourage you to read the above article to appreciate the little intricacies or requiring static constructor, BeforeFieldInit, volatile etc.

However: If you just want the easiest lazy evaluation solution in .net4+, then you’ve come to the right place.

image

Lazy<T> guarantees thread-safe lazy construction.


UPDATE:

If I’d followed Jon’s notice, at the top of the page I linked to, I would have seen the post is now located here and moreover, he covers the Lazy<T> approach there.


That pesky iOS keyboard again


In my previous post I showed you how to have the keyboard resign first responder status when Return is pressed.

A little tip: is that you don’t need to set the delegate in code like my previous post, you can use the connections pane and Crtl drag from the textbox delegate to the view controller in the Outlets section.

Screen Shot 2012-10-18 at 12.30.27

Still not good enough

I still had a little niggle about this keyboard covering my view, I really wanted to see what I was doing, so here’s my solution.

I move the view up by y amount of pixels (-120pixels in this sample).

Why negative 120? Well given that your y coordinate starts at 0,0 on the top left (i think I’ve just got a flashback of OS/2 having the origin at the lower left corner… shudder…) we move upwards.

Here is our beautiful UX before we start editing

Screen Shot 2012-10-18 at 12.58.12

When the keyboard presents after the textbox gains first responder status it’s now covered.

So we move the view up

image

When we’re finished we move it back down

image


So how did we implement this function?

image

We change the view frame to shift the y position, and we did it in an animation to give it a little jazz.. 0.6 seconds is a way too slow for my liking but it does really show off the animation for demo purposes.

Here is what it ends up looking like:

Screen Shot 2012-10-18 at 12.58.28

IPhone: remove the IOS Keyboard on Return

Ok this is another XCode/ Objective-c/ IOS post. Stop reading now if you feel sick MSFT fans Winking smile

So you’ve written an app and you test out that new data entry field only to find out that the keyboard covers you action buttons and you can’t get it to disappear,,, we’ve all been there, now I’ll explain how to stop this happening.

Add a new protocol to your controller

What does this mean? well to people from a c# background think of it as an interface where the methods can be optional. We add this interface to our Controller much the same way syntactically that specify generic types in c#

Screen Shot 2012-09-18 at 13.47.40

TextFieldShouldReturn

Next we implement the method in the protocol that we are interested in. We do two things in this method, first we call a function on the textField to resign the first responder and then we return YES.

Screen Shot 2012-09-18 at 13.53.17

Set the delegate

So we are nearly there, we just need to hook up the textField and the delegate, we do this on the viewDidLoad function.

Screen Shot 2012-09-18 at 13.55.03

That’s pretty much it.

SignalR chat on Azure


At lunch today I created a little fun website and it only took about 15 minutes (as you can plainly see from the styling).

Technologies

The technologies involved were

  • Azure (website)

  • SignalR

  • Asp MVC 4

  • .NET 4 (because at the time of writing Azure doesn’t support .net 4.5 not that I need it).

  • Let me explain how I did it, the reason I did it was simple, I was sick to death of seeing all these posts on SignalR without actually having used it. Asp MVC is my choice of web tech these days so that was a foregone conclusion, and Azure has provided 10 free Azure websites for these sort of sites.Here we see the main page with an eductational video
    image

    Here we see a test with two local browsers
    imageStep 1.Create a ASP MVC4 Web internet web application, add a Chat controller. Add a view for the Index method.
image
    Step 2. Import the SignalR package
image
    Step 3. Add the following class to your project.
image


Step 4. Add the following javascript to your project

image


Step 5. Check it out for yourself, www.manfluanonymous.com

I left it running earlier and these are the messages that people entered over the last few hours.

image

Disclaimer: I copied the SignalR code from someone on the net, if i could remember who I’d give credit.

Kendo Datasource & MVC4 WebApi, you broke my heart


So I’ve spend many a sleepless night this week knowing that the webapplication i was working was not doing server side paging…

This morning I decided I needed to remedy that and was I in for an experience Smile

At first I was thinking why oh why had the kendo guys not got the finger out and implemented WebApi support… and I’ve come to the conclusion that they didn’t waste any time on a moving platform…. in fact I'd go as far to say as the platform was actually removed with MVC4 RTM… let me explain….

OData support


I’ve previously mentioned that the MS guys are going to provide a more robust OData support, this is a good thing, there’s currently an alpha package for those who date http://www.nuget.org/packages/Microsoft.AspNet.WebApi.OData

However what I failed to notice was that they removed the existing OData support altogether!!
Don’t get me wrong i think this was a good decision not ot have a half implemented solution with a fuller one on the way, it’s just it’s gone and broken many of my WebApis Sad smile

Not to worry, we are where we are and now I need the WebApi to support paging, which previously relied on OData $top $skip $count.

So here is my current solution.

Server

Return:

My return values now have a Total and the Data, I used the following class to help me out here.

image

Parameters

I added some new classes for Pagable parameters, note the Take, Skip,Page,PageSize are sent with kendoui datasource (from fiddler)

image

ApiCall

Here is a sample API call, as previously mentioned I don’t like that I’ve cluttered it up with pagination, (maybe I should consider ModelBinders or MediaFormatters…..)

image


Client

Now for the Kendo javascript side:

image

The first important part I had was I had to map the parameters, the reason is that I’m updating the datasource via ajax and I call it like this:

ds.read(s0); I.e. I’m passing some parameters to the query ( i know there is mention of a query object in the kendo api but I failed to get this working),  in the javascript above I’m just setting these parameters again when the paging happens. Note this was where I could set e.g. $top = options.take; if odata was supported…. Sad smile

The next important part is that, I’m getting the result from the .Data field and I’m getting the total form the result.Total field (i also do a bit of mapping for some missing values but that’s application specific).


kr, Brian.